Difference between revisions of "Downloading a bit stream to the board"
| (7 intermediate revisions by the same user not shown) | |||
| Line 1: | Line 1: | ||
| − | These instructions assume that you have created or obtained a bit file (.bit extension). They take you through the use of iMPACT to download this file to the Spartan 3E FPGA on the | + | These instructions assume that you have created or obtained a bit file (.bit extension). They take you through the use of '''iMPACT''' to download this file to the Spartan 3E FPGA on the Basys Board. |
| − | 1. Plug in the | + | 1. Plug in the 5V power supply of the Basys board. The switch at the lower left of the board (SW8) should be set to VEXT (up). The red LED (LD8) near the power connector should be on. Make sure you have the right plug! |
| − | 2. Without using the Project Navigator, from the Start menu select Programs->Xilinx ISE 9.2i->Accessories->iMPACT. | + | 2. Without using the Project Navigator, from the '''Start''' menu select '''Programs->Xilinx ISE 9.2i->Accessories->iMPACT'''. |
3. After a few seconds you should have the windows below. | 3. After a few seconds you should have the windows below. | ||
| − | [[File: | + | [[File:Impact1.jpg]] |
| − | 4. Select Cancel in the iMPACT Project window. | + | 4. Select '''Cancel''' in the''' iMPACT Project''' window. |
| − | 5. From the Edit menu in the iMPACT window, select Launch Wizard as shown below. | + | 5. From the '''Edit''' menu in the '''iMPACT''' window, select '''Launch Wizard''' as shown below. |
[[File:impact2.jpg]] | [[File:impact2.jpg]] | ||
| − | 6. In the window below leave all the options as they are and click on Finish and the program will talk to the | + | 6. In the window below leave all the options as they are and click on '''Finish''' and the program will talk to the Basys board to find out what devices it has. |
| + | |||
[[File:impact3.jpg]] | [[File:impact3.jpg]] | ||
| − | 7. iMPACT should report (see below) that it found two devices, the Xilinx Spartan | + | 7. '''iMPACT''' should report (see below) that it found two devices, the Xilinx Spartan 3E FPGA (xc3s100e) and a flash memory (xcf02s). (If you got an error it's probably because you forgot to plug in the power supply on the Basys board. If the power is on, try this again by right clicking in the main window and selecting '''Initialize Chain'''. If it's still not working ask for help.) |
| − | [[File: | + | |
| + | [[File:Impact4.jpg]] | ||
| + | |||
| + | 8. In the '''Assign New Configuration File''' window, browse to find your bit file and then click open. | ||
| − | |||
| − | |||
[[File:impact5.jpg]] | [[File:impact5.jpg]] | ||
| − | + | (Ignore the warning about the Startup clock.) | |
| − | + | ||
| − | 10. Right click on the first device (the FPGA) and it will turn green. Select Program from the menu as shown below. | + | 9. You will then be asked to select a configuration file for the second device (the flash memory) as shown below. Select '''Bypass''' since we are not using the flash memory to configure the FPGA. |
| − | [[File: | + | |
| + | [[File:Impact6.jpg]] | ||
| + | |||
| + | 10. Right click on the first device (the FPGA) and it will turn green. Select '''Program''' from the menu as shown below. | ||
| + | |||
| + | [[File:Impact7.jpg]] | ||
| + | |||
| + | 11. The window (shown below) with configuration options will appear. Leave all options as they are and click on '''OK''' to begin the download. | ||
| − | |||
[[File:impact8.jpg]] | [[File:impact8.jpg]] | ||
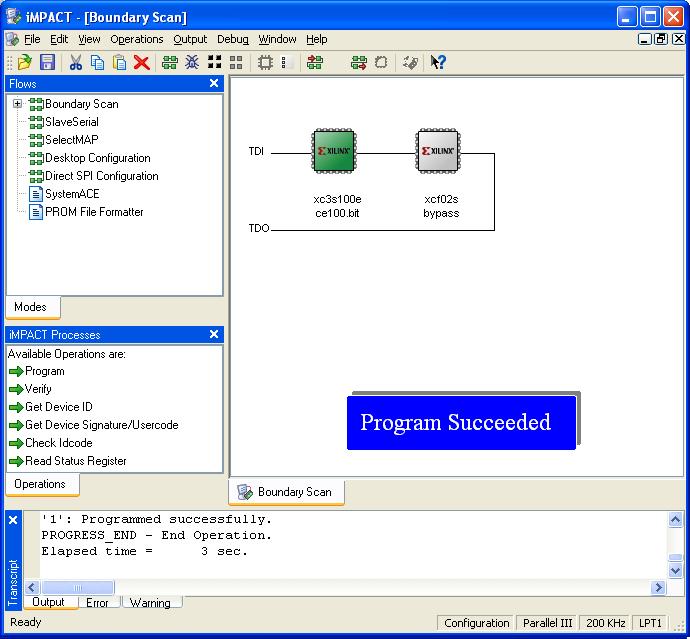
| − | 12. If all went well you should have the screen below and the green LED ( | + | 12. If all went well you should have the screen below and the green LED (LD-D) on the Basys board near the PROG pushbutton should be on. If so, congratulations: you have successfully configured the FPGA. |
| − | + | ||
| − | If instead you have a red box indicating that the programming failed, check that you have the correct files for the two devices, press the PROG pushbutton on the | + | If instead you have a red box indicating that the programming failed, check that you have the correct files for the two devices, press the PROG pushbutton on the Basys board and try again. If this fails, disconnect and then reconnect the 5V power supply and try again. If it still does not work, ask for help. |
| + | |||
| + | [[File:impact9.jpg]] | ||
| − | 13. Do not save the configuration file when you exit Impact. | + | 13. '''Do not save''' the configuration file when you exit '''Impact'''. |
| − | 14. Important Please remember to unplug the power connector of | + | 14. '''Important''' Please remember to unplug the power connector of Basys board when you are done. |
| − | The CMPE100 Web: Copyright | + | The CMPE100 Web: Copyright 2011; Department of Computer Engineering, University of California, Santa Cruz. |
Latest revision as of 22:11, 23 March 2011
These instructions assume that you have created or obtained a bit file (.bit extension). They take you through the use of iMPACT to download this file to the Spartan 3E FPGA on the Basys Board.
1. Plug in the 5V power supply of the Basys board. The switch at the lower left of the board (SW8) should be set to VEXT (up). The red LED (LD8) near the power connector should be on. Make sure you have the right plug!
2. Without using the Project Navigator, from the Start menu select Programs->Xilinx ISE 9.2i->Accessories->iMPACT.
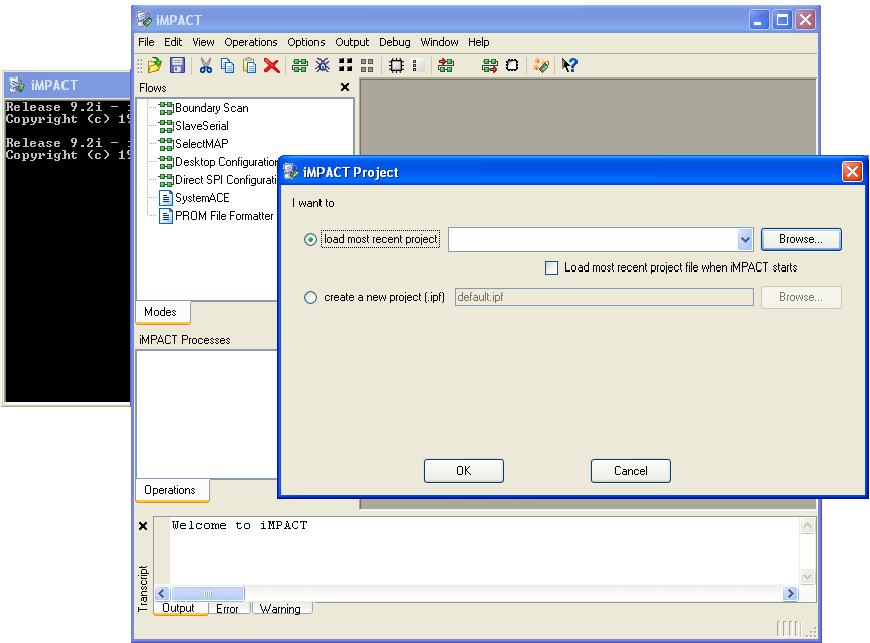
3. After a few seconds you should have the windows below.
4. Select Cancel in the iMPACT Project window.
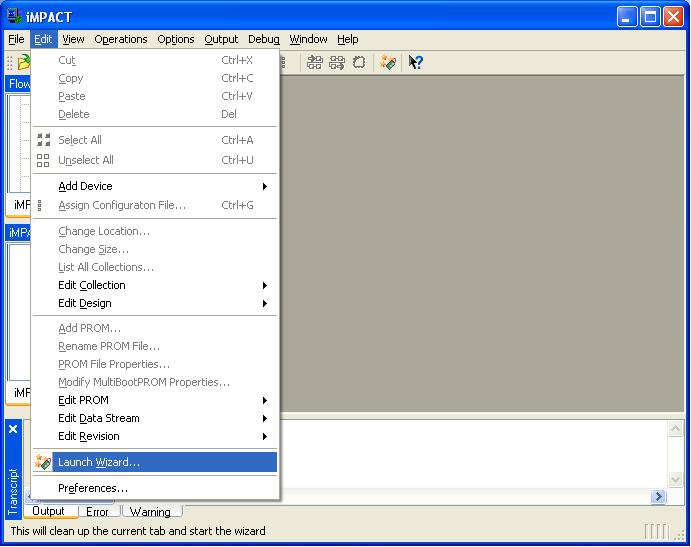
5. From the Edit menu in the iMPACT window, select Launch Wizard as shown below.
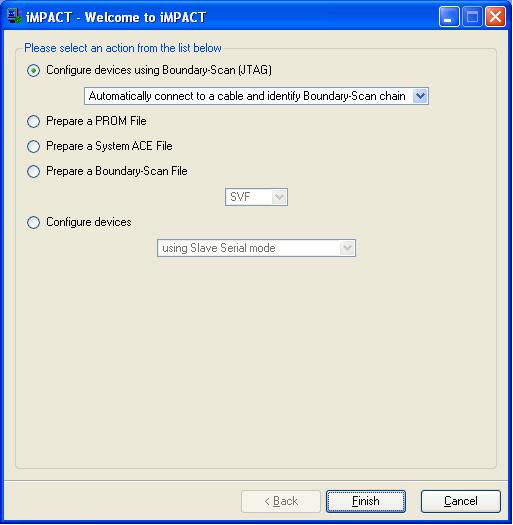
6. In the window below leave all the options as they are and click on Finish and the program will talk to the Basys board to find out what devices it has.
7. iMPACT should report (see below) that it found two devices, the Xilinx Spartan 3E FPGA (xc3s100e) and a flash memory (xcf02s). (If you got an error it's probably because you forgot to plug in the power supply on the Basys board. If the power is on, try this again by right clicking in the main window and selecting Initialize Chain. If it's still not working ask for help.)
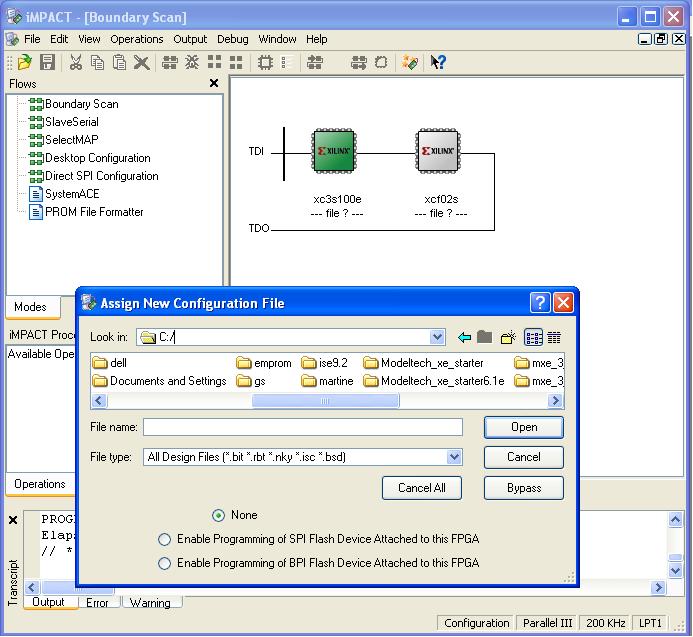
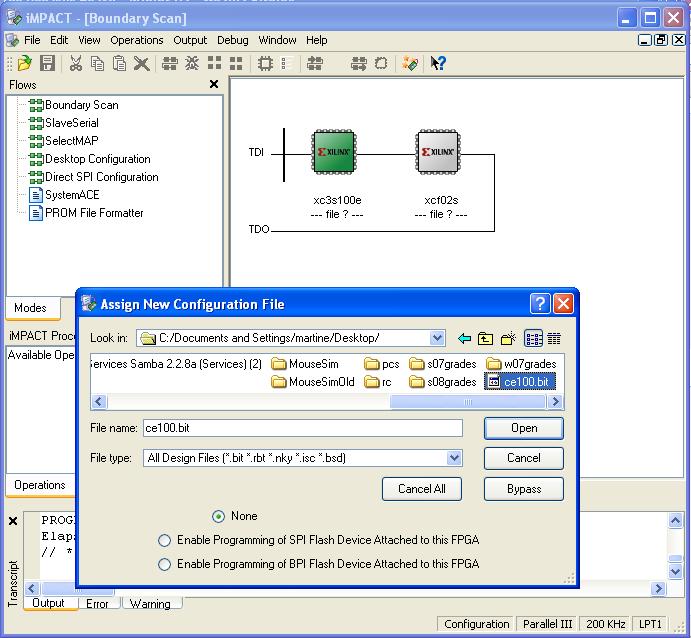
8. In the Assign New Configuration File window, browse to find your bit file and then click open.
(Ignore the warning about the Startup clock.)
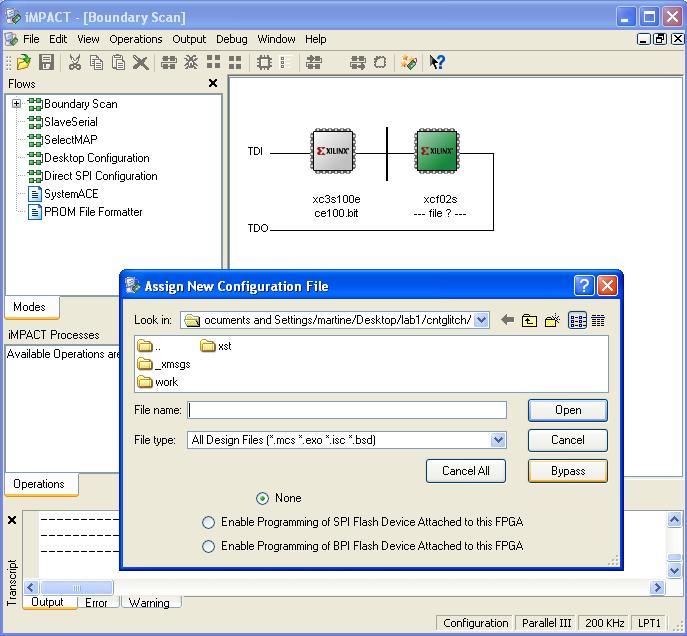
9. You will then be asked to select a configuration file for the second device (the flash memory) as shown below. Select Bypass since we are not using the flash memory to configure the FPGA.
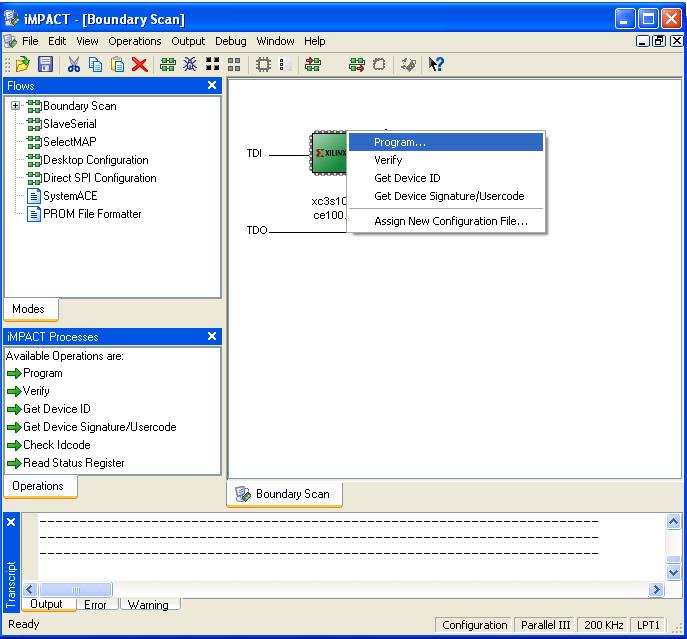
10. Right click on the first device (the FPGA) and it will turn green. Select Program from the menu as shown below.
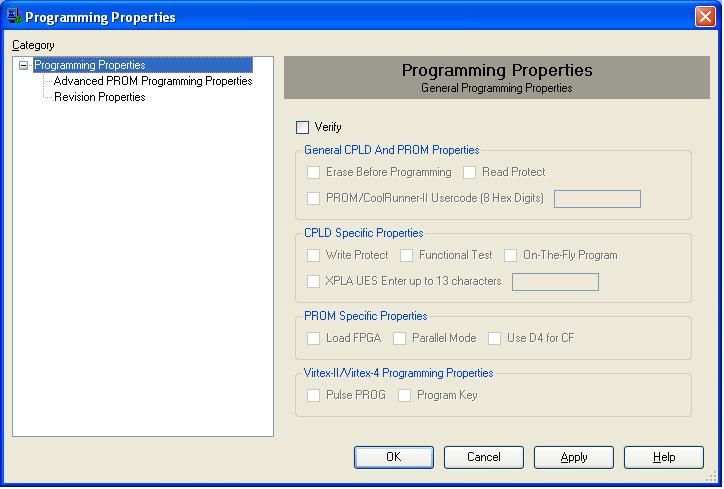
11. The window (shown below) with configuration options will appear. Leave all options as they are and click on OK to begin the download.
12. If all went well you should have the screen below and the green LED (LD-D) on the Basys board near the PROG pushbutton should be on. If so, congratulations: you have successfully configured the FPGA.
If instead you have a red box indicating that the programming failed, check that you have the correct files for the two devices, press the PROG pushbutton on the Basys board and try again. If this fails, disconnect and then reconnect the 5V power supply and try again. If it still does not work, ask for help.
13. Do not save the configuration file when you exit Impact.
14. Important Please remember to unplug the power connector of Basys board when you are done.
The CMPE100 Web: Copyright 2011; Department of Computer Engineering, University of California, Santa Cruz.
