Difference between revisions of "Creating a schematic symbol"
| Line 6: | Line 6: | ||
[[File:Sym1.JPG]] | [[File:Sym1.JPG]] | ||
| − | 1. Select New Source from the Project menu and create a new schematic called mux. | + | 1. Select '''New Source''' from the Project menu and create a new schematic called '''mux'''. |
[[File:Sym2.JPG]] | [[File:Sym2.JPG]] | ||
| − | 2. In the Schematic Editor window (pull it out of the Navigator), draw the schematic below to create a 2-to-1 multiplexer. Make sure to put I/O markers (as shown), but do not use ibufs/obufs (these are only for the FPGA inputs/outputs). (If you're not sure how to do this see the instructions for entering a schematic.) | + | 2. In the Schematic Editor window (pull it out of the Navigator), draw the schematic below to create a 2-to-1 multiplexer. Make sure to put I/O markers (as shown), but '''do not use ibufs/obufs''' (these are only for the FPGA inputs/outputs). (If you're not sure how to do this see the instructions for entering a schematic.) |
[[File:Sym3.JPG]] | [[File:Sym3.JPG]] | ||
| − | 3. After checking the schematic, select Save from the File menu and then exit the schematic editor. | + | 3. After checking the schematic, select '''Save''' from the File menu and then exit the schematic editor. |
| − | 4. The mux schematic now appears listed in the top left pane. Select it and then double click on Create Schematic Symbol under the Design Utilities in the Processes pane. | + | 4. The mux schematic now appears listed in the top left pane. Select it and then double click on '''Create Schematic Symbol''' under the '''Design Utilities''' in the Processes pane. |
[[File:Sym4.JPG]] | [[File:Sym4.JPG]] | ||
| − | 5. Double click on the top-level schematic (still world.sch here) to edit it. Pull the schematic editor out of the Project Navigator. Click on the Symbols tab and there will be a new category of symbols with your symbol (mux). You can select mux and place it in the schematic just as you would any other symbol. | + | 5. Double click on the top-level schematic (still world.sch here) to edit it. Pull the schematic editor out of the Project Navigator. Click on the '''Symbols''' tab and there will be a new category of symbols with your symbol ('''mux'''). You can select '''mux''' and place it in the schematic just as you would any other symbol. |
[[File:Sym5.JPG]] | [[File:Sym5.JPG]] | ||
| − | The pins of mux correspond to the input/output markers in its schematic. Anything connected to pin x0 will be connected within the mux symbol in the same manner as x0. The pin name x0 is private to mux. A wire labeled x0 in the schematic above will not be connected to pin x0 (unless the wire itself is connected to the pin named x0). | + | The pins of '''mux''' correspond to the input/output markers in its schematic. Anything connected to pin '''x0''' will be connected within the '''mux''' symbol in the same manner as '''x0'''. The pin name '''x0''' is private to '''mux'''. A wire labeled '''x0''' in the schematic above will not be connected to pin '''x0''' (unless the wire itself is connected to the pin named '''x0'''). |
6. Draw a 4-to-1 Multiplexer as shown below using three 2-to-1 Multiplexers. | 6. Draw a 4-to-1 Multiplexer as shown below using three 2-to-1 Multiplexers. | ||
| Line 30: | Line 30: | ||
[[File:Sym6.JPG]] | [[File:Sym6.JPG]] | ||
| − | 7. After saving your top-level schematic, take a look at the Project Navigator window (below). Note that three instances of mux are now listed under your top level schematic (world). | + | 7. After saving your top-level schematic, take a look at the Project Navigator window (below). Note that three instances of '''mux''' are now listed under your top level schematic (world). |
[[File:Sym7.JPG]] | [[File:Sym7.JPG]] | ||
| − | 8. Back in the Schematic Editor, select the any one of the mux symbols in the top-level schematic, right click on it, and then select Push into Symbol under Symbol > . (You can also select Push into Symbol from the View menu.) | + | 8. Back in the Schematic Editor, select the any one of the '''mux''' symbols in the top-level schematic, right click on it, and then select''' Push into Symbol''' under '''Symbol''' > . (You can also select''' Push into Symbol''' from the View menu.) |
[[File:Sym8.JPG]] | [[File:Sym8.JPG]] | ||
| − | This will open another schematic editor window for mux in the Project Navigator as shown below. The tabs underneath the drawing window let you move easily between schematics. Note that when you change the mux schematic, you are changing all mux instances. | + | This will open another schematic editor window for '''mux''' in the Project Navigator as shown below. The tabs underneath the drawing window let you move easily between schematics. Note that when you change the mux schematic, you are changing '''all''' mux instances. |
[[File:Sym9.JPG]] | [[File:Sym9.JPG]] | ||
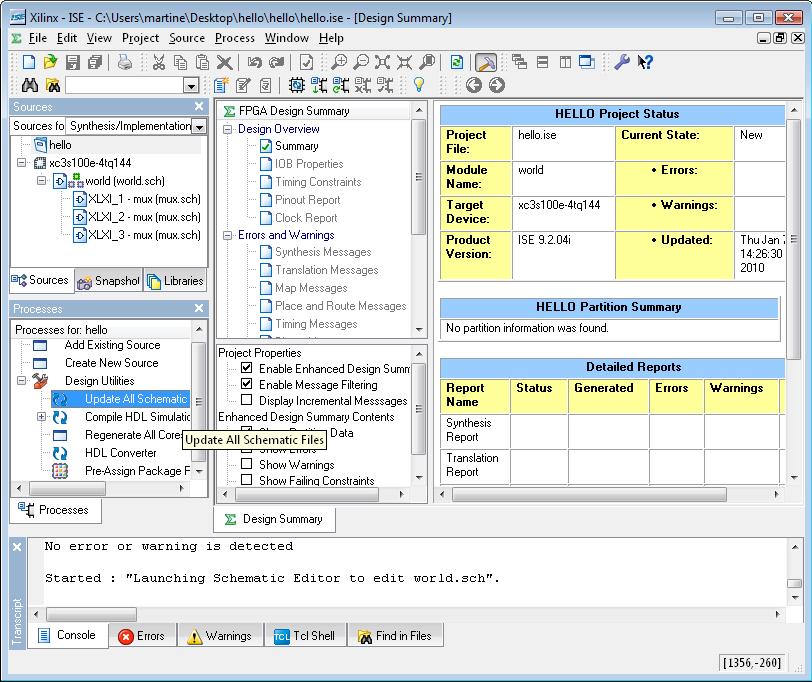
| − | When you make a change to a symbol that appears in other schematics, it may be necessary to update those schematics. This happens when you change a symbols' pins: adding a pin, deleting a pin or renaming a pin. A convenient way to do this is to select the project in the Sources pane and double click on Update All Schematic Files under the Design Utilities in the Processes pane as shown above. | + | When you make a change to a symbol that appears in other schematics, it may be necessary to update those schematics. This happens when you change a symbols' pins: adding a pin, deleting a pin or renaming a pin. A convenient way to do this is to select the project in the Sources pane and double click on '''Update All Schematic Files''' under the '''Design Utilities''' in the Processes pane as shown above. |
| + | |||
| + | |||
| + | |||
| + | The CMPE100 Web: | ||
| + | Copyright 2011; Department of Computer Engineering, University of California, Santa Cruz. | ||
Latest revision as of 23:06, 23 March 2011
By using symbols you can introduce hierarchy in the schematic and easily replicate logic. A user-defined symbol represents the logic drawn in another schematic. The I/O markers in the symbol's schematic become the pins of the symbol. The scopes of the labels within a symbol are limited to that symbol.
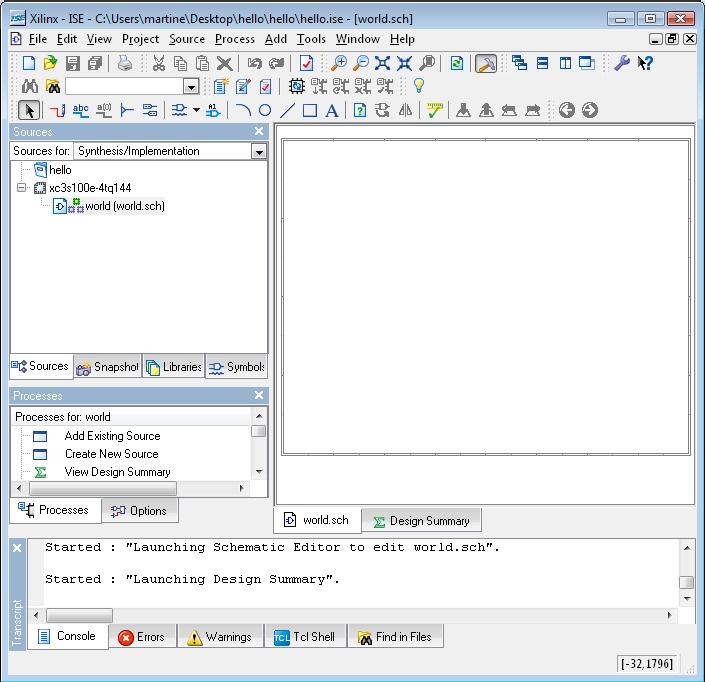
These instructions assume that you have already created a project with a (possibly empty) top level schematic as pictured below: (If not, follow the instructions for Creating a new project.)
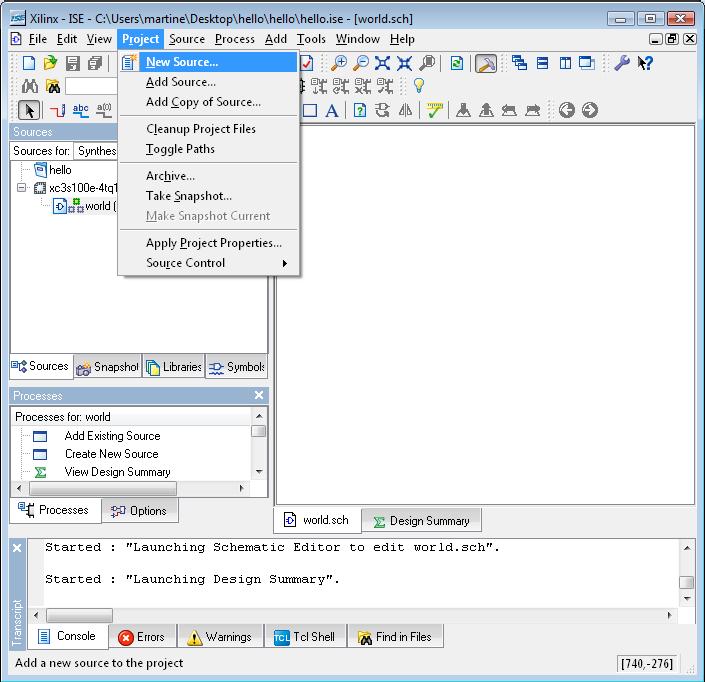
1. Select New Source from the Project menu and create a new schematic called mux.
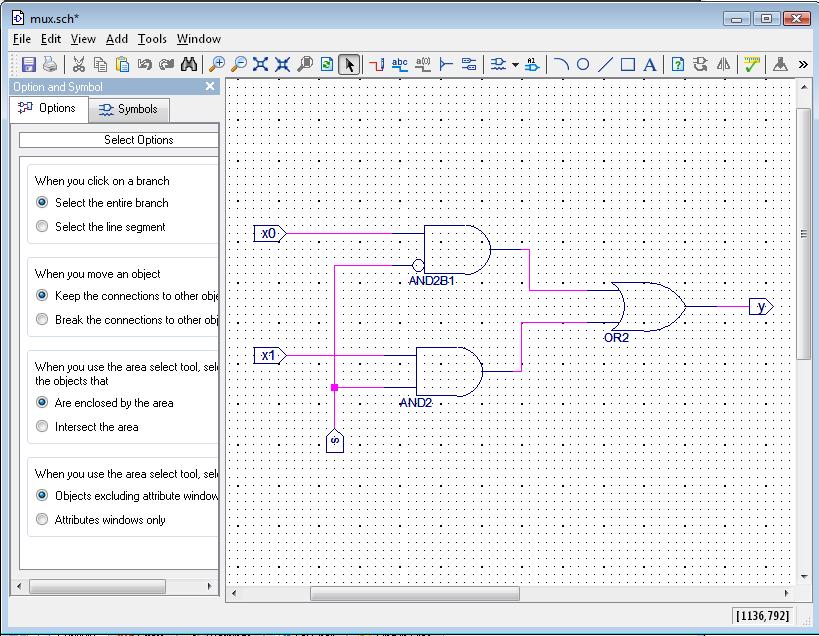
2. In the Schematic Editor window (pull it out of the Navigator), draw the schematic below to create a 2-to-1 multiplexer. Make sure to put I/O markers (as shown), but do not use ibufs/obufs (these are only for the FPGA inputs/outputs). (If you're not sure how to do this see the instructions for entering a schematic.)
3. After checking the schematic, select Save from the File menu and then exit the schematic editor.
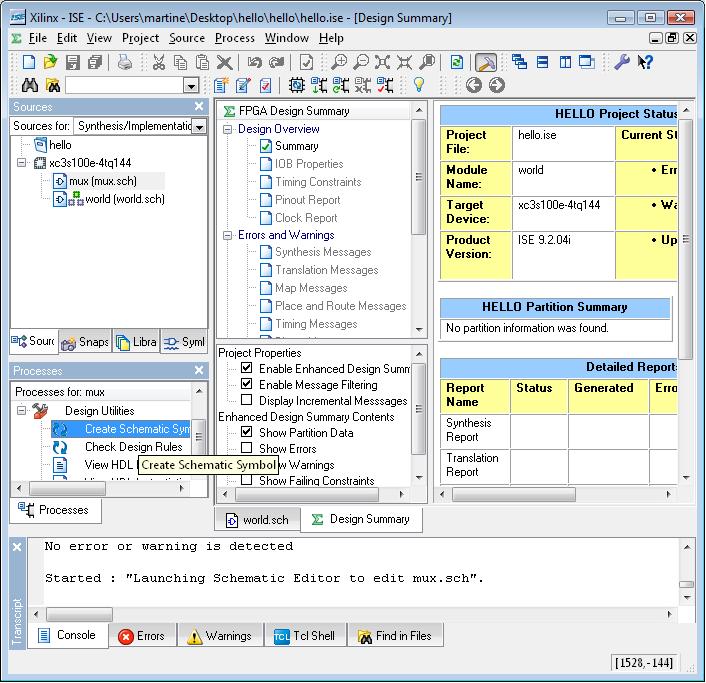
4. The mux schematic now appears listed in the top left pane. Select it and then double click on Create Schematic Symbol under the Design Utilities in the Processes pane.
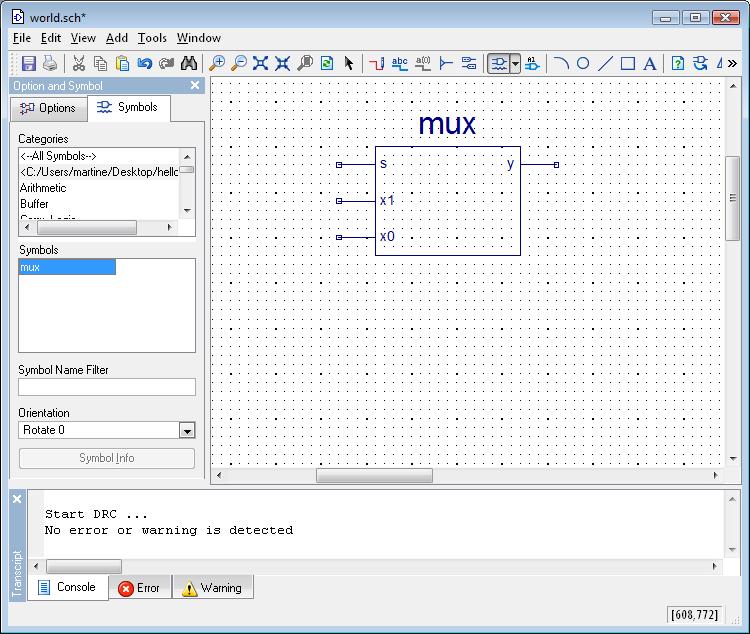
5. Double click on the top-level schematic (still world.sch here) to edit it. Pull the schematic editor out of the Project Navigator. Click on the Symbols tab and there will be a new category of symbols with your symbol (mux). You can select mux and place it in the schematic just as you would any other symbol.
The pins of mux correspond to the input/output markers in its schematic. Anything connected to pin x0 will be connected within the mux symbol in the same manner as x0. The pin name x0 is private to mux. A wire labeled x0 in the schematic above will not be connected to pin x0 (unless the wire itself is connected to the pin named x0).
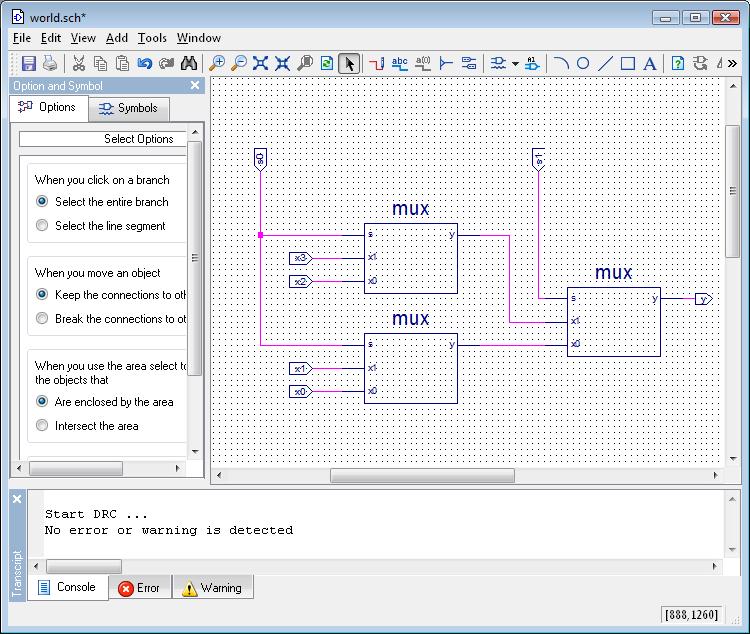
6. Draw a 4-to-1 Multiplexer as shown below using three 2-to-1 Multiplexers.
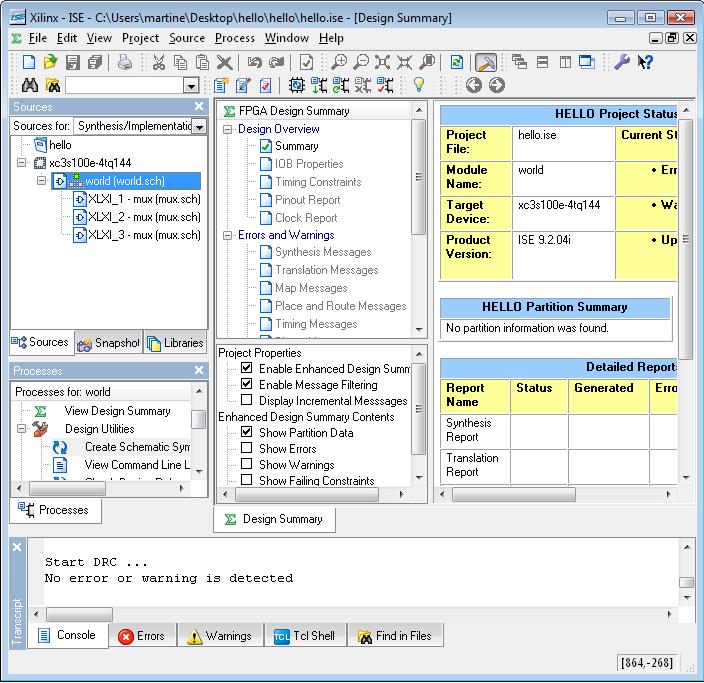
7. After saving your top-level schematic, take a look at the Project Navigator window (below). Note that three instances of mux are now listed under your top level schematic (world).
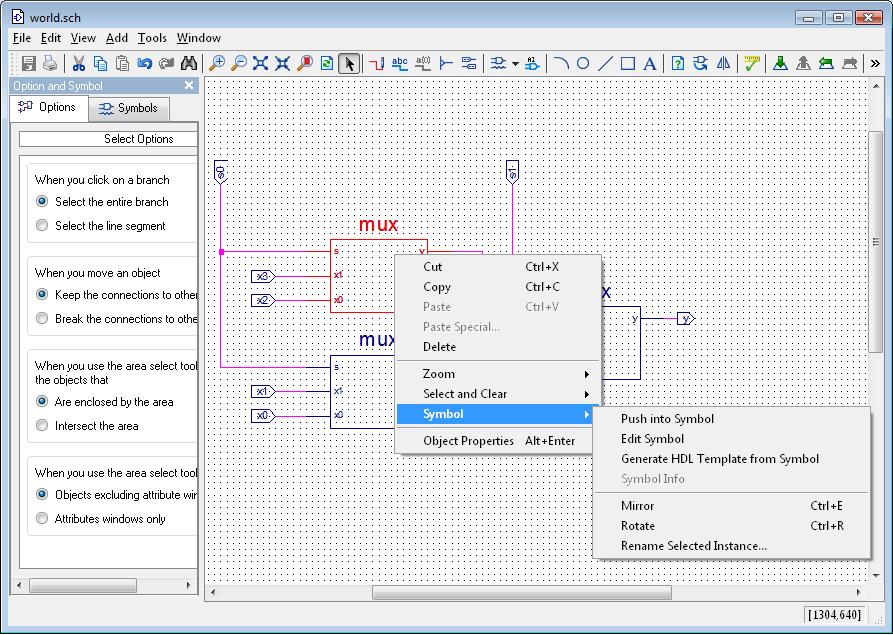
8. Back in the Schematic Editor, select the any one of the mux symbols in the top-level schematic, right click on it, and then select Push into Symbol under Symbol > . (You can also select Push into Symbol from the View menu.)
This will open another schematic editor window for mux in the Project Navigator as shown below. The tabs underneath the drawing window let you move easily between schematics. Note that when you change the mux schematic, you are changing all mux instances.
When you make a change to a symbol that appears in other schematics, it may be necessary to update those schematics. This happens when you change a symbols' pins: adding a pin, deleting a pin or renaming a pin. A convenient way to do this is to select the project in the Sources pane and double click on Update All Schematic Files under the Design Utilities in the Processes pane as shown above.
The CMPE100 Web: Copyright 2011; Department of Computer Engineering, University of California, Santa Cruz.
