Back Annotation
Back-Annotation
The above simulation did not actually include the parasitic capacitances and resistances of the interconnect. It only included the gate, source, and drain parameters that were available in the spice models. In order to include the extra interconnect parasitics, we must re-extract our FO4 inv_test layout, but with an additional flag enabled. When you select Verify->Extract in the layout window, click the "Set Switches" button. This will open an additional window with a set of options. Highlight the "Extract_parasitic_caps" option. This will put parasitic resistors and capacitors in the new extracted view. Run LVS as you did before. After it completes, select "Build Analog" in the LVS menu. This will create a new view called "analog_extracted" that has your schematic with the back-annotated parasitics. Now, in order to get Ultrasim to actually use the the analog_extracted view, we need to do a trick. In the main library manager window, select File->New->Cell View... This will open a new window. In the new window select the cell test_setup from your library. For the tool, specify "Hierarchy-Editor". This should automatically change the view name to "config." This view allows us to specify which view provides the netlist for our simulator. Press "OK;.
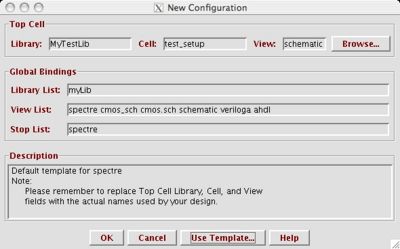
Two new windows now open. One is the "New Configuration" window and the other is the "Cadence hierarchy editor" window. In the "New Configuration" window, specify your test_setup schematic as the top cell. Then click the "Use Template..." button. In another new window, select "spectre" as the template name. This should fill in some of the global bindings as shown here:
Click "OK" in the "New Configuration" window.
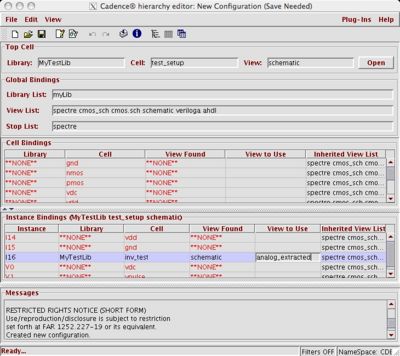
Now, in the hierarchy editor, select the test_setup in the "Cell Bindings" area. Then, select View->Instance Table from the top menus. This should open a new section in the hierarchy editor. In order to change the view used to the analog_extracted view, find the "inv_test" cell in the instance bindings. It should say "schematic" under the view found. Most of the other symbols will say "**NONE**". That is ok since they are library elements. Now, in the "View to Use" column for the inv_test cell, click and type in "analog_extracted" as shown here:
Press the tab key to move out of the field you are editing. Then select File->Save to save the new config cell view. Quit the hierarchy editor.
In order to simulate with the new extracted view, go back to the Tools->Analog Environment from the test_setup schematic view. When the window first pops up, select Setup->Design and chose the "config" view name of test_setup. As you did before with the schematic, set up the models, analyses, and outputs to be viewed. However, now, it will be using the extracted cell view instead of the schematic cell view. To confirm that we are actually simulating extracted parasitics, you can view the netlist under Simulation->Netlist->Display in the Analog Design Environment. In the netlist, you should see:
// Library name: MyLib
// Cell name: inv_test
// View name: analog_extracted
You will also see some capcitive parasitic elements like this:
\+74 (_net1 _15) capacitor c=3.5356e-17 m=1

